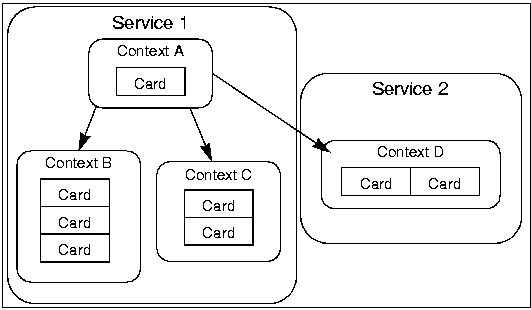
Phone.com extensions to WML provide the concept of nested contexts to help you structure your WML service. Specifically, contexts help you do the following:
Contexts correspond to tasks the user wants to carry out; each context consists of one or more cards. A WML service can provide multiple contexts to its users. For example, an email service could provide contexts such as "Create a New Message" and "View Inbox". The "Create a New Message" context might include cards to choose an e-mail address, enter a subject, and enter the message body.
Figure 2-1. provides a conceptual overview of services and contexts.
Figure 2-1.
Services and contexts
The WML examples in Chapter 1 demonstrate simple individual contexts, each of which consists of a single linear series of cards. However, many services need to provide more complex contexts, which contain sub-contexts or child contexts. For example, suppose you are implementing the inbox portion of an email service. The overall context that a user accomplishes with an email inbox is viewing mail. A nested context is reading an individual piece of mail. In some cases, contexts are nested several levels deep. For example, responding to a message could be a nested context within the viewing mail context.
When you design a WML service, you should use an approach similar to the "top-down" design approach popularized by structured programming languages. Start with general contexts and then divide them into progressively smaller child contexts. Continue until you have divided the child contexts into cards. Structuring your service this way yields a tremendous advantage: when you code it in WML, many of the trickier aspects of WML, such as navigation and variable scoping, virtually take care of themselves. If you use contexts correctly, your application's user interface will be clean and intuitive.
Chapter 1 provides examples that use the <go> and <prev> task types to navigate from card to card within a context. To navigate between contexts, you use the following task types.
There are some special options that you can use with these task types. These options are discussed later in this chapter.
the <go> and <spawn> elements appears subtle, it is important. When you request a card (URL) with <go>, you are including it in the current context. When you request a card with <spawn>, you are effectively starting a new, child context.
To implement a context in WML, follow these general guidelines:
<go> and <prev> elements.
<spawn> element to request the first card in the child context.
<exit> or <throw> elements.
Suppose you want to provide a simple news service that allows the user to get news headlines and stories. Figure 2-2 graphically represents the contexts and tasks that the service provides.
Figure 2-2.
Contexts and cards for a simple news service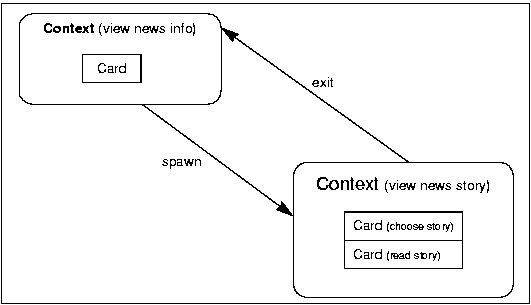
Figure 2-3.
Implementation of a news service "view story" context.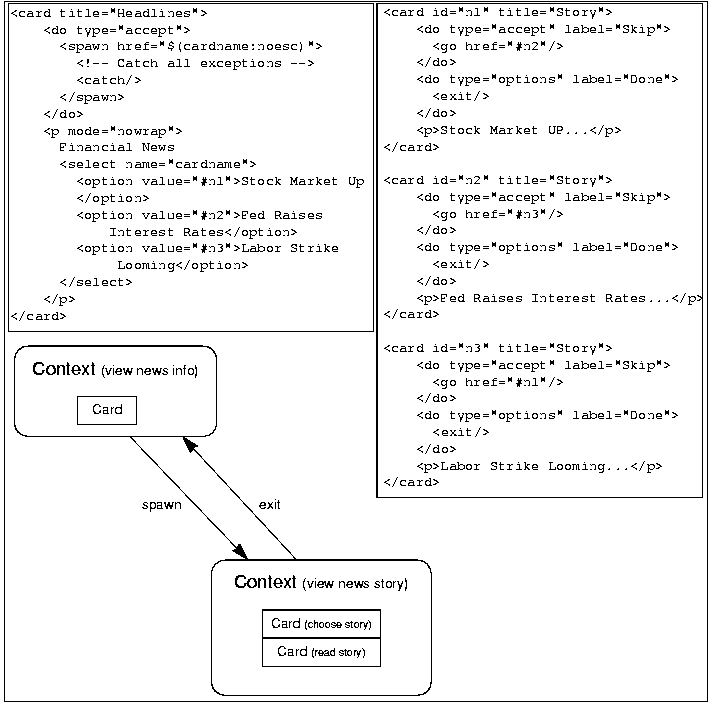
This simple application demonstrates how to implement a list of items, the details for which may be browsed one item after the other. News headlines are presented in a top-level menu (the parent context). After the user selects a headline, they can then skip to view each news story in succession. When the user selects the "Done" soft key, the nested context is exited and all news story cards are removed from the history stack. This significantly simplifies navigation for the user since there is no risk of revisiting any of the news story cards when the PREV key is pressed to leave the news application and return to the calling application (for example, a portal service).
Note that there is no particular correspondence between contexts and WML decks. A deck can contain multiple contexts and a context can span multiple decks.
Chapter 1 describes how the phone maintains a history stack of the cards the user visits. That is a simplification of what the phone does: the phone actually maintains a history stack of visited contexts and the cards the user visits within those contexts. Each time the user navigates to a nested context, the phone pushes the current context onto the history stack. When the phone pushes a context on to the stack, it maintains the entire user interface state of the calling context, including its variable values and the cards the user has visited in it. When the user navigates from a nested context back to the context that called it, the phone pops the nested context off the stack, restoring the calling context (and its user interface state) to the top of the stack.
Figure 2-4 illustrates the state of the history stack at each stage of the interface described in the previous section.
Figure 2-4.
History stack for sample news service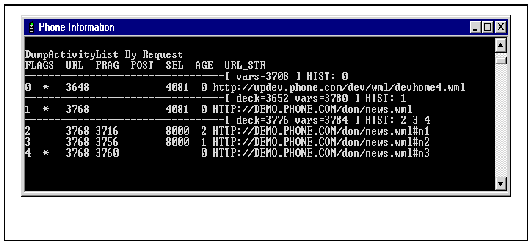
Note that when the user returns to the top-level card, the item he or she chooses is still chosen. This is because the phone has preserved the state of the context.
Of course, after the user has backed up and the phone has popped a context off the stack, the child context's user interface state is lost.
The scope of a WML variable is a context. A context can include many cards; any card in a context can reference variables in any other card in the context. Until the user invokes a destination that uses the <spawn> element, or issues an <exit/> or <throw/> task to pop the current context, the variables remain in scope.
There are several ways a nested context can allow a user to return to a calling context:
<exit> element in the first card of the context.
<throw> task.
<prev> task in the first card of the child context.
By default each of these returns the user to the card in the calling context that invoked the nested context assuming there is a <catch> element or onexit attribute. In some cases, you might not want to return the user to the card in the calling context that invoked a nested context. For example, if the card provides a list which the nested context modifies, returning directly to it would be undesirable--because the list would be obsolete.
Fortunately, you can change the default navigation from a nested context back to the context that called it. You can change the navigation by specifying the following WML elements and attributes:
<spawn onexit="NextCard"> element and attribute specifies which card to go to if the child context is exited with the <exit> element.
<throw> element raises an exception, terminates the active child context and returns to the appropriate <catch> element exception handler.
<prev> element raises a specific exception named "prev," terminates the active child context, and returns to the <catch name="prev"> element exception handler.
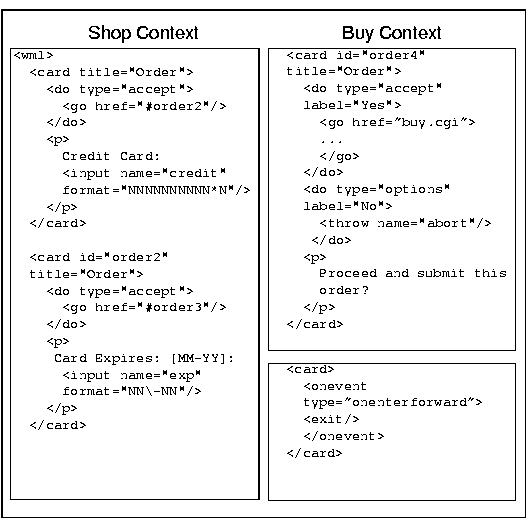
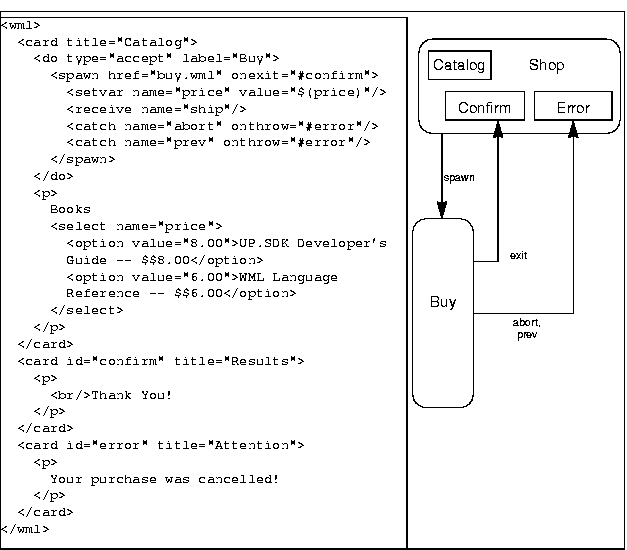
Processing an e-commerce or financial transaction is a good example of where return events can be used to pass completion status from a child context back to a parent context. In the bookstore example application that follows, the parent context allows the user to select a book from the store's catalog. When the user selects a book, the parent context calls a child context (buy.wml), which implements the purchase transaction (acquiring the user's credit card information, committing the purchase to the server's database, etc.). There are three possible events that could occur, depending on how the child context returns.
The result of all three return events is that an implicit "go" task is executed, and the card named in the associated event handler (onexit or onthrow) is pushed on the history stack of the parent context. When the user presses the accept key after viewing the "confirm" or "error" card, the card is popped from the history stack, and the user is taken back to the main "catalog" card.
Note that a key advantage to implementing the transaction as a child context is that the user's credit card information is managed in a secure and temporary variable space. When the child context exits, the credit card variables are automatically cleared from browser memory eliminating the risk of other applications reading the variables. In general, nested contexts should always be used to manage private user data.
WML provides several mechanisms for passing information between contexts:
<setvar> element to set variable values for a nested context.
<receive> element to specify variables that accept return values from the child context; the child context uses the <send> element to return values to these variables
The following sections describe these methods of passing variable information in more detail.
The <setvar> element sets variables by name that can then be used in child contexts. The syntax for the <setvar> element is:
The child context uses the variable names to reference variables that the calling context specifies in the <setvar> element; it must know the names of the variables in order to use them.
To accept return values from a child context, you specify the <send> element in the child context and the <receive> element in the calling context.
Each <send> element specifies a value to return to the parent context. When the child context exits, the phone uses the values in the <send> elements to set the corresponding <receive> variables.
The phone assigns the return values by position. That is, it assigns each value in a series of <send> elements to the variables that occupy the corresponding position in a series of <receive> elements. If the <send> element series doesn't provide a corresponding value for a variable in the <receive> elements, the phone clears the variable so it has no value.
The table below provides some examples of how the phone sets variables in a <receive> element series:.
In the bookstore application, the parent context allows the user to select a book from the store's catalog. When the user selects a book, the associated item code is passed to the child context, so that the value can subsequently be used to query the server-side database. The parent context passes the current value of the local variable named "code." In the child context, a local variable named "item" is initialized with the same value. The variable named "code" is scoped in the parent context, while the variable named "item" is scoped in the child context:
To improve the usability of the bookstore application, the code is enhanced so that the details of the user's purchase are passed back to the parent context when the child context exits. The parent context then displays the transaction details in the "Results" card. When the child context exits, it sends the total cost of the purchase, along with the number of days it will take for the order to ship. The "send" values are generated dynamically by the "buy.cgi" script on the server-side. Note that the card that executes the "exit" task, does so transparently using an "onenterforward" event. This allows the buy.cgi script to return back to the browser and exit the child context without requiring the user to press any keys.
 Parent Context