Like conventional Web sites, a WML service usually consists of a set of screens that present information with which users can interact. In WML, these screens are defined as a set of one or more cards. The actual correspondence between cards and screens depends on the device display size, as well as how you define your cards. On larger devices, the UP.Browser may present a card as a single screen. On smaller devices, the same card may appear as multiple screens. The key to constructing an efficient and easy-to-use WML service is determining the best way to:
Before discussing how to navigate between multiple cards, it is helpful to look at a simple synopsis of the <card> element:
type" label="label">
url"/>
text
<card> element and its attributes, see the WML Language Reference.
As in HTML, navigation in WML occurs by specifying URLs. To navigate between multiple cards and decks, you simply specify the URL you want to open.
To navigate to a particular card, specify a URL with the following syntax:
If you do not specify a card, the device automatically displays the first card in the deck.
For example, if the deck services/mydeck.wml has the following definition,
</wml>
you would specify services/mydeck.wml (the URL of the deck) to navigate to the first card. To navigate to the third card, you would specify the URL:
If you want to navigate from one card to another card in the same deck, you can also use a relative URL and simply reference it as #card_id.
Specifying CGI arguments within URLs deserves special attention because two important differences exist between HTML and WML:
URL="?foo=bar" reloads the current URL with the foo argument. Specifying URL="?" reloads the current URL with no arguments.
& to specify the ampersand (&) character when you use CGI arguments within URL strings.
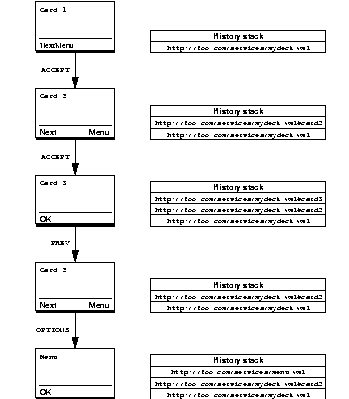
The UP.Phone maintains a history of the cards the user visits. Each time the user navigates forward to a card, the UP.Phone pushes it on to the history stack. When the user invokes the PREV mechanism, the UP.Phone pops the current card off the history stack and returns to the previous card.
UP.Phone history operation is similar to that of most Web browsers, with the exception that users cannot navigate forward through the history stack--the current card is always at the top of the stack.
For example, suppose the deck described above defines the following cards:
Figure 1-1. Card history stack
Figure 1-1 illustrates how the history stack changes as the user navigates between various cards.
To view the history stack in the UP.Simulator, choose Info>History. Note that the UP.Simulator displays the history stack from bottom to top in the Phone Information window--in other words, from least-recently visited to most-recently visited. So, for example, the history stack for the Menu card shown above would appear as follows:
wml
wml#card2
wml
As described above, the <do> element lets you associate an action (for example, going to a particular URL) with a mechanism for invoking it (for example, pressing the ACCEPT or OPTIONS function key). You can define multiple <do> statements for a card, each of which assigns a task to a specific key or user interface mechanism.
In some cases, you may want to assign the same task to a particular key for every card in a deck. One way to accomplish this is to specify identical <do> statements within each <card> statement. As shown in the following example, a more efficient way is to use the <template> element to define behavior that applies to the entire deck:
wml"/></wml>
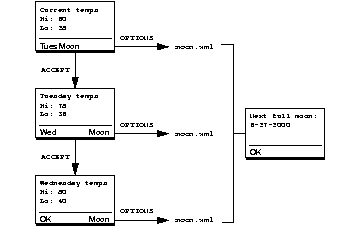
As illustrated in Figure 1-4, the <template> statement instructs the UP.Browser to do the following for every card in the deck:
OPTIONS key with the word Moon.
moon.wml if the user presses the OPTIONS key.
The <do> statements apply only to the cards for which they are defined. The <do> statement for the first card instructs the UP.Browser to:
ACCEPT key from OK (the default) to Tues.
tues if the user presses the ACCEPT key.
The <do> statement for the second card instructs the UP.Browser to:
ACCEPT key from OK to Wed.
wed if the user presses the ACCEPT key.
Figure 1-4. Deck with multiple cards
The third card in the deck has no <do> statement because the default action for the ACCEPT key is to return to the previous card. If the user presses the ACCEPT key, the UP.Browser automatically displays the previous card. For more information about the default actions for different keys, see the WML Language Reference.
As shown in the previous example, you can define <do> statements at both the deck level (using the <template> element) and the card level. A deck-level <do> statement applies to all cards in the deck. A card-level <do> statement applies to the individual card only. Card-level definitions override (or shadow) deck-level definitions if both statements have the same NAME or are of the same TYPE if you do not specify a NAME.
The following example (illustrated in Figure 1-5) defines a deck-level <do> statement for the ACCEPT key. The first card in the deck specifies a <do> statement with the same type attribute, so the card-level binding overrides the deck-level binding for that card. The deck-level binding still applies to the second and third cards in the deck.
Figure 1-5. Card-level action that supersedes deck-level action
The sample deck on page 14 also illustrates that card navigation can span multiple decks. The card that displays the date of the next full moon could have been defined in the same deck as the other cards. Because of packet size limitations, however, it often makes sense to break cards into separate decks.
As shown in line 4 of Figure 1-2, you can use a relative URL to specify another deck in the same directory. As mentioned earlier, you do not have to specify a card name when navigating to a different deck unless you want to go to a card other than the first card in the deck.
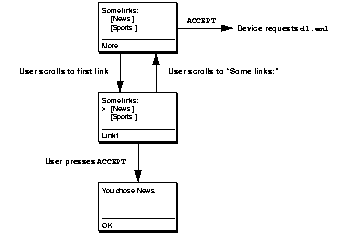
Anchored links provide another mechanism for letting users navigate between cards and decks. Unlike the more generic <do> element in which you can bind a task to a variety of user interface mechanisms, users always invoke the task associated with an anchored link by pressing the ACCEPT key. As in HTML, WML links are anchored to text which the device displays in a different manner than surrounding text. WML links can also be anchored to the <img> element. The following is a synopsis of the <anchor> element, which defines an anchored link:
There is also a short form syntax for anchors. It uses the <a> tag instead of the <anchor> tag and can only be used to define (implied) go tasks that require a URL specification:
The following WML defines a card with several links (shown in Figure 1-6).
wml"/>
Figure 1-6. Card with anchored links
NOTE
When users scroll to an anchored link, the ACCEPT key label (and task) specified by the <a> element takes precedence over the <do> element binding. Users can access the "default" action for the ACCEPT key by positioning the cursor on a line other than an anchored link.