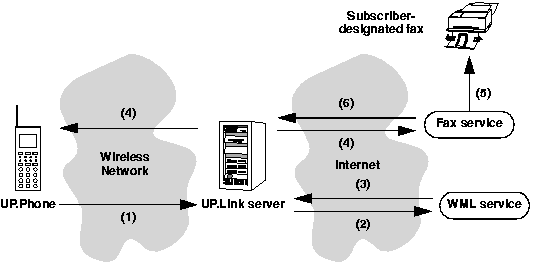
The UP.Link Server allows your service to initiate faxes on behalf of a subscriber without having a billing relationship with the subscriber or the fax service. The UP.Link Fax Manager logs all the faxes sent by subscribers on an UP.Link Server, allowing the UP.Link operator to directly bill subscribers for the faxes. This arrangement makes it easy for you to provide fax services to UP.Link subscribers: you don't need to log faxes or bill subscribers.
The UP.Link Server supports the following document types as fax or fax response formats:
text/plain)
application/msword )
application/rtf )
application/pdf)
Figure 3-2 presents an overview of how the UP.Link Fax Manager works. The steps in the process are listed below.
Figure 3-2. Simplified view of Fax Manager operation
The Acme employee directory sample application shipped with the UP.SDK provides an example of how to send a fax. The faxing module of the application is implemented in the faxDocument() function in the acme_emp.cgi file. The following sections briefly explain how to send a fax. However, it is recommended that you use the sample application as a starting point for your own service's fax module.
The Perl class library Fax.pm makes it easy to create and send a fax (for C routines that do the same thing, see examples/source/digests/fax.h). For more information, see the UP.SDK Tools and APIs Guide.
The following are the general steps to implement fax capabilities in your WML service:
x-up-fax-accepts, x-up-fax-limit x-up-fax-encodings headers. For information on checking these headers, see page 67.
x-up-fax-limit HTTP header. If the fax exceeds the limit, display an error deck informing the user that the fax cannot be sent. If the x-up-fax-limit HTTP header is set to 0, the UP.Link Server is not accepting any faxes at all.
Fax::New() method to create faxes. The New() method allows you to specify the fax number, the fax content, and the fax content type ("application/postscript" or "text/plain").
setComment() to add a comment to the cover page, and setRecipientName() and setSenderName() to set the recipient and sender names. For a complete list of these methods, see the UP.SDK Tools and APIs Guide.
Digest::addFax() method. You can include multiple faxes in the same digest.
The following code sends a fax to Mr. Joe Recipient at 415-555-5555. To keep the code simple, the fax number, recipient, and content are hardcoded. When you write your own code to send faxes, you will normally want to prompt the user for this information.
To test this code, save it as a CGI script, then request its URL. When you request the URL, the script returns a digest containing the fax and a WML deck that confirms that the fax has been sent. The UP.Link Server removes the fax from the digest and forwards it to the fax service. It then sends the digest to the UP.Phone which displays the confirmation deck. You must use the UP.Simulator in UP.Link mode to test this code.
# Load required application utilities
require Digest;# Code to check fax variables (x-up-fax-accepts,
# x-up-fax-limit, and x-up-fax-encodings) goes here# Fax number. CHANGE TO A REAL NUMBER
$faxNum = "4155555555"; # Must include area code# Create a deck to confirm to user that fax was sent
$ACKDECK = <wml># Add deck that confirms fax was sent
$digest->addDeck("?ns=ack", $ackdeck);# Add the fax response to the digest
$digest->addFax ($fax);To test fax capabilities, you must use a real UP.Phone or run the UP.Simulator in UP.Link mode. For more information on running the UP.Simulator in UP.Link mode, see Chapter 1 in theUP.SDK Tools and APIs Guide.
After you have sent a fax, you can check on its status. If the UP.Phone or UP.Simulator is registered on the Phone.com Developer UP.Link Server (devgate2), check the status of faxes by doing the following:
If you are running the UP.Simulator, make sure it is running in UP.Link mode and is set to use devgate2.
The Fax Status screen appears. A letter appears in brackets next to each fax to indicate its status.
The following table shows status indicators and their meanings.
To see detailed information about a particular fax in the Fax Status list, choose the fax and press ACCEPT. To get updated status on all faxes, press OPTIONS.
If you are checking fax status on an UP.Link Server other than devgate2, the Fax Status item may be on a different menu (for example, the Directory menu). For more information, see the documentation provided by the UP.Link provider.
NOTE
The devgate2 UP.Link Server provides a special Web interface for viewing the fax log for any of the subscribers you have provisioned. This option is a devgate2 debugging tool only. You cannot access fax status information on production UP.Link Servers. For information on using this tool, see the UP.SDK Tools and APIs Guide.